How to replace water heater thermostat
- bradleyserranomark
- Aug 7, 2025
- 5 min read
How to Replace a Water Heater Thermostat: A Step-by-Step DIY Guide
A faulty water heater thermostat can leave you taking cold showers, dealing with inconsistent temperatures, or wasting energy. While a malfunctioning thermostat may seem like a serious issue, replacing it is actually a manageable DIY task. With the right tools, safety measures, and instructions, even a novice homeowner can successfully replace a water heater thermostat.
In this comprehensive guide, you’ll learn everything you need to know about how to replace a water heater thermostat—safely, correctly, and confidently.
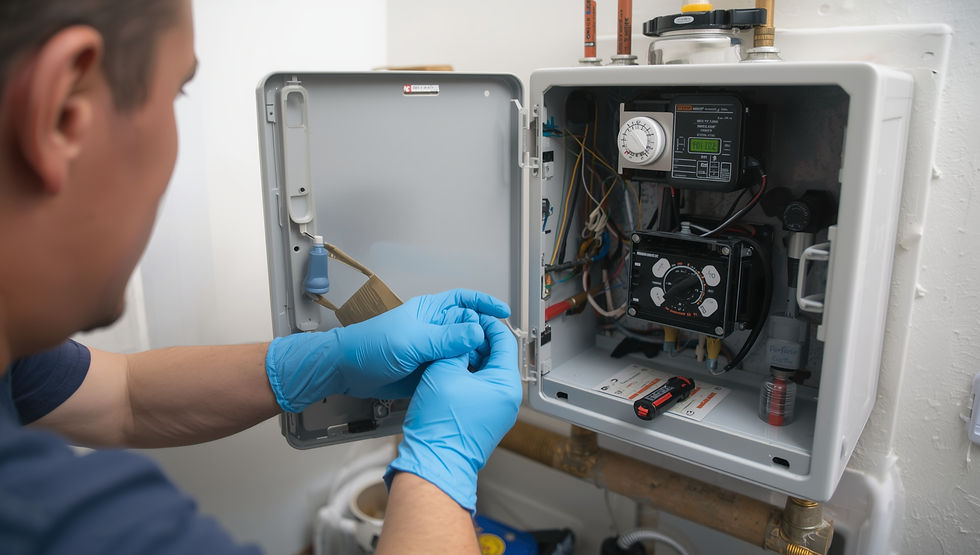
Table of Contents
What Is a Water Heater Thermostat?
How Does a Thermostat Work in an Electric Water Heater?
Signs of a Bad Water Heater Thermostat
Tools and Materials You’ll Need
Safety First: Preparation Steps
How to Replace the Thermostat: Step-by-Step Guide
How to Test the New Thermostat
Tips for Success
When to Call a Professional
Conclusion
1. What Is a Water Heater Thermostat?
A water heater thermostat is a device that controls the temperature of the water inside your electric water heater. It ensures your water stays at the set temperature by turning the heating elements on or off as needed.
Electric water heaters usually come with two thermostats and two heating elements—one at the top and one at the bottom. These work in tandem to heat the water evenly and efficiently.
2. How Does a Thermostat Work in an Electric Water Heater?
Each thermostat is paired with its own heating element:
The upper thermostat controls the top heating element and also manages when the lower element kicks on.
Once the upper thermostat senses the water at the top is hot enough, it switches power to the lower thermostat, which then heats the bottom portion of the tank.
If one thermostat fails, your water may be warm but not hot. If both fail, you’ll likely have no hot water at all.
3. Signs of a Bad Water Heater Thermostat
Before jumping into replacement, make sure the thermostat is really the issue. Here are the most common symptoms:
No hot water: Could mean either the upper thermostat or both are bad.
Warm water only: Indicates a possible failure of the lower thermostat.
Overheating water: The thermostat may not be shutting off when it should.
Circuit breaker tripping: Could be a thermostat, a shorted heating element, or wiring issue.
Inconsistent temperature: A failing thermostat may struggle to maintain the set temperature.
4. Tools and Materials You’ll Need
Before you begin, gather the following tools and materials:
Tools:
Flathead screwdriver
Phillips screwdriver
Multimeter (for testing)
Needle-nose pliers (optional)
Electrical tape (optional)
Materials:
New thermostat (make sure it’s compatible with your heater model)
Replacement insulation (if the old one is damaged)
Work gloves
Flashlight (for dark spaces)
5. Safety First: Preparation Steps
Working with electricity is dangerous if not handled properly. Take these safety steps before doing any work:
Turn off power at the breaker. Go to your home’s electrical panel and switch off the breaker marked “Water Heater.”
Double-check power is off using a multimeter. Touch one probe to the water heater's metal shell and another to each terminal screw.
Do not attempt to work on a gas water heater with these instructions—this guide is for electric models only.
Let the water cool for several hours before working, to avoid burns if you accidentally touch heated components.
6. How to Replace the Thermostat: Step-by-Step Guide
Step 1: Access the Thermostat
Locate the upper and lower access panels on the front of the water heater. Use a screwdriver to remove the screws holding the panels in place. Inside, you’ll find a layer of insulation—pull this back gently to reveal the thermostat.
Step 2: Identify the Faulty Thermostat
If you're only replacing one thermostat, you’ll need to figure out which one is failing:
No hot water at all? Check the upper thermostat.
Only warm water? The lower thermostat is likely the issue.
To be sure, use a multimeter to test both thermostats and their connected heating elements for continuity.
Step 3: Take a Photo of the Wiring
Before you touch any wires, take a clear photo of how everything is connected. This reference will help ensure you rewire the new thermostat correctly.
Step 4: Disconnect the Thermostat
Loosen the terminal screws and gently disconnect the wires. You can use needle-nose pliers if needed. Then remove the thermostat from the metal retaining clip that holds it in place.
Step 5: Install the New Thermostat
Take your new thermostat and slide it into the retaining clip. Make sure it's snug and sitting flush against the tank.
Reconnect the wires to the appropriate terminals, using the photo you took earlier for reference. Tighten the screws securely, but be careful not to overtighten.
Step 6: Set the Temperature
Most thermostats come pre-set at 120°F (49°C), which is considered safe and energy-efficient. If you want to adjust the temperature, use a flathead screwdriver to turn the dial. Never exceed 140°F (60°C), as this increases the risk of scalding.
Step 7: Reinstall Insulation and Cover
Put the insulation back over the thermostat. If the original insulation is damaged or soaked, replace it. Then screw the access panel back into place.
Step 8: Turn Power Back On
Return to the electrical panel and flip the breaker back on. Your water heater will begin heating again.
7. How to Test the New Thermostat
Allow the heater about 30–60 minutes to warm up. Then:
Run hot water from a faucet.
Check if the water temperature is appropriate and consistent.
If the water is still not heating properly, you may have an issue with the heating element instead of the thermostat.
Use your multimeter to test the heating element for continuity if problems persist.
8. Tips for Success
Here are a few pro tips to help ensure your project goes smoothly:
Replace both thermostats together if your heater is more than 5 years old. If one has failed, the other may not be far behind.
Label your wires if you're unsure about your memory or don’t want to rely solely on a photo.
Clean corrosion from terminal screws before connecting the wires.
Don’t skip insulation. It’s crucial for maintaining temperature and energy efficiency.
Avoid guessing. If you’re not 100% sure the power is off, don’t proceed.
9. When to Call a Professional
Replacing a water heater thermostat is typically a safe and manageable job for homeowners. However, call a licensed plumber or electrician if:
You don’t feel comfortable working with electrical wiring
The water heater still doesn’t work after thermostat replacement
You notice signs of electrical damage, like melted wires or scorch marks
The unit is leaking or shows signs of rust or corrosion
Professional help may cost more, but it ensures the job is done safely and can prevent expensive damage or hazards.
10. Conclusion
A faulty water heater thermostat doesn’t mean you have to replace the entire unit—or even call a plumber. With basic tools, a good understanding of the steps involved, and proper safety measures, you can replace a thermostat yourself in under an hour.
Whether you’re restoring your hot water, saving on service costs, or just taking better care of your home’s systems, learning how to replace a water heater thermostat is a valuable DIY skill. Just remember: safety first, take your time, and if in doubt, don’t hesitate to bring in a professional.


Comments